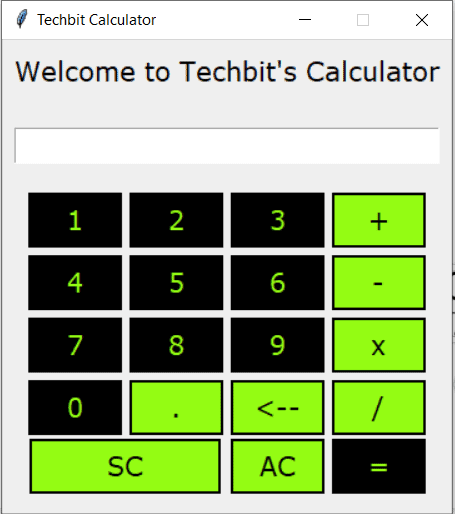
In this tutorial, we will build a Graphic User Interface application in Python. The project aims to develop a GUI calculator in Python language using the Tkinter package. Tkinter is one of the most popular Python packages to make GUI applications. Tkinter is not only fast but it is also very easy to work with. That’s why it is the topmost choice when it comes to creating GUI in python.
Applications made in Tkinter may look a little old-school, but one can always take the advanced approach to style it better. The way forward is using tkinter. Tkinter acts more like the structure and ttk works on the beautification of that structure.
Table of Contents
Pre-requisites to code a GUI Calculator in Python
- Tkinter comes installed when we first install python. So just to be double sure before moving ahead, check the version of it by typing the following in the terminal:
import tkinter
print(tkinter.TkVersion)- Or you can install it using the following:
pip install tk- Any code editor of your choice to follow along. I have used VS Code here.
- Understanding of basic concepts of core python to help you grab the program code better.
Working Logic
Our approach to making a GUI Calculator in Python is very simple and easy to follow. We have divided the whole process into points to make you understand it better:
Importing Tkinter
- We have first imported everything from tkinter module. Along with it, we have imported tkinter.messagebox which is used to display a message box in Python.
from tkinter import *
from tkinter.messagebox import *
Creating a Container
- Our application needs front-end elements to operate properly. So we need a window or a container in which we can place them. We have created our window using window= Tk(). The variable name “window” is not fixed. One can give it any name of your choice. Following which, we have given geometry to define the window size of our application. After that, we have given the title and added the heading label to it.
window = Tk()
window.title("Techbit Calculator")
window.geometry("360x380")
window.resizable(0, 0)
window.configure(background='#EEEEEE')
headingLabel = Label(window,
                     text="Welcome to Techbit's Calculator",
                     font=font,
                     foreground='#000000')
headingLabel.pack(side=TOP, pady=10)
Designing our Application
- We have first created a frame to place our text field.
- Then created our text field to display everything that a user clicks on.
- Again created another frame to hold our buttons.
- Then again using grid, created all of our buttons and placed them in proper rows and columns.
- After that, we have binded our buttons to their respective functions.
textField = Entry(window, font=font, justify="center")
textField.pack(side=TOP, pady=20, padx=10, fill=X)

buttonFrame = Frame(window)
buttonFrame.pack(side=TOP)
temp = 1
for i in range(0, 3):
    for j in range(0, 3):
        btn = Button(buttonFrame,
                     text=str(temp),
                     font=font,
                     width=5,
                     relief="solid",
                     background='#000',
                     foreground='#94FC13',
                     activebackground='#94FC13',
                     activeforeground='#000')
        btn.grid(row=i, column=j, pady=3, padx=3)
        temp += 1
        btn.bind('<Button-1>', click_btn_function)
Note: Find the complete code at the last of the article. The code is written with comments at every step to help you get through the code better.
Defining Functions
- We have defined functions here. The functions are responsible for what happens when the user clicks on a button. Also the binding of the buttons with the function that is to be executed is also done in this step.
def clear():
   #find the code in the end
def all_clear():
def click_btn_function(event):

dividebtn.bind('<Button-1>', click_btn_function)
multiplybtn.bind('<Button-1>', click_btn_function)
Running our Application
- Now we have completed binding our UI elements to their functions. Finally we can run our application to see what we’ve coded till now. For that, we have used window.mainloop().
window.mainloop()
Complete Code
from tkinter import *
from tkinter.messagebox import *

#font-family and font-size declaration
font = ("Verdana", '16')

#function for backspace key
def clear():
    ex = textField.get()
    ex = ex[0:len(ex) - 1]
    textField.delete(0, END)
    textField.insert(0, ex)

#function for allclear key
def all_clear():
    textField.delete(0, END)

#function to make calculations possible and displaying errors if any unacceptable input encountered
def click_btn_function(event):
    b = event.widget
    text = b['text']
    print(text) #displaying the clicked values in the display bar

    if text == 'x':
        textField.insert(END, '*') #using multiplication operator
        return

    if text == '=': #displaying the result in the display bar/throwing error
        try:
            ex = textField.get()
            answer = eval(ex)
            textField.delete(0, END)
            textField.insert(0, answer)
            return
        except Exception as e:
            print("Error...", e)
            showerror("Error", e)
        return
    textField.insert(END, text)

#creating a tkinter container
window = Tk()
window.title("Techbit Calculator") #giving title to our tkinter container
window.geometry("360x380") #defining window size
window.resizable(0, 0) #preventing resizing of window
headingLabel = Label(window,
                     text="Welcome to Techbit's Calculator",
                     font=font,
                     foreground='#000000') #creating heading label

headingLabel.pack(side=TOP, pady=10)
window.configure(background='#EEEEEE')
#Creating a frame for the input field
textField = Entry(window, font=font, justify="center")
textField.pack(side=TOP, pady=20, padx=10, fill=X)

buttonFrame = Frame(window)
buttonFrame.pack(side=TOP)

#Creating frame and running loop to display numbers from 1 to 9
temp = 1
for i in range(0, 3):
    for j in range(0, 3):
        btn = Button(buttonFrame,
                     text=str(temp),
                     font=font,
                     width=5,
                     relief="solid",
                     background='#000',
                     foreground='#94FC13',
                     activebackground='#94FC13',
                     activeforeground='#000')
        btn.grid(row=i, column=j, pady=3, padx=3)
        temp += 1
        btn.bind('<Button-1>', click_btn_function)

#Creating frames for the all the operators and assignments
Zerobtn = Button(buttonFrame,
                 text='0',
                 font=font,
                 width=5,
                 relief="solid",
                 background='#000',
                 foreground='#94FC13',
                 activebackground='#94FC13',
                 activeforeground='#000')
Zerobtn.grid(row=3, column=0, pady=3, padx=3)

Dotbtn = Button(buttonFrame,
                text='.',
                font=font,
                width=5,
                relief="solid",
                background='#94FC13',
                foreground='#000',
                activebackground='#000',
                activeforeground='#94FC13')
Dotbtn.grid(row=3, column=1, pady=3, padx=3)

backbtn = Button(buttonFrame,
                 text='<--',
                 font=font,
                 width=5,
                 relief="solid",
                 background='#94FC13',
                 foreground='#000',
                 activebackground='#000',
                 activeforeground='#94FC13',
                 command=clear)
backbtn.grid(row=3, column=2, pady=3, padx=3)

plusbtn = Button(buttonFrame,
                 text='+',
                 font=font,
                 width=5,
                 relief="solid",
                 background='#94FC13',
                 foreground='#000',
                 activebackground='#000',
                 activeforeground='#94FC13')
plusbtn.grid(row=0, column=4, pady=3, padx=3)

minusbtn = Button(buttonFrame,
                  text='-',
                  font=font,
                  width=5,
                  relief="solid",
                  background='#94FC13',
                  foreground='#000',
                  activebackground='#000',
                  activeforeground='#94FC13')
minusbtn.grid(row=1, column=4, pady=3, padx=3)

multiplybtn = Button(buttonFrame,
                     text='x',
                     font=font,
                     width=5,
                     relief="solid",
                     background='#94FC13',
                     foreground='#000',
                     activebackground='#000',
                     activeforeground='#94FC13')
multiplybtn.grid(row=2, column=4, pady=3, padx=3)

dividebtn = Button(buttonFrame,
                   text='/',
                   font=font,
                   width=5,
                   relief="solid",
                   background='#94FC13',
                   foreground='#000',
                   activebackground='#000',
                   activeforeground='#94FC13')
dividebtn.grid(row=3, column=4, pady=3, padx=3)

clearbtn = Button(buttonFrame,
                  text='AC',
                  font=font,
                  width=5,
                  relief="solid",
                  background='#94FC13',
                  foreground='#000',
                  activebackground='#000',
                  activeforeground='#94FC13',
                  command=all_clear)
clearbtn.grid(row=4, column=2, columnspan=2)

equalbtn = Button(buttonFrame,
                  text='=',
                  font=font,
                  width=5,
                  relief="solid",
                  background='#000',
                  foreground='#94FC13',
                  activebackground='#000',
                  activeforeground='#EAEAEA')
equalbtn.grid(row=4, column=3, columnspan=2)

#Scientific functionality is not in use currently!
scienbtn = Button(buttonFrame,
                  text='SC',
                  font=font,
                  width=11,
                  relief="solid",
                  background='#94FC13',
                  foreground='#000',
                  activebackground='#000',
                  activeforeground='#94FC13')
scienbtn.grid(row=4, column=0, columnspan=2)

#binding the buttons with their function
dividebtn.bind('<Button-1>', click_btn_function)
multiplybtn.bind('<Button-1>', click_btn_function)
minusbtn.bind('<Button-1>', click_btn_function)
plusbtn.bind('<Button-1>', click_btn_function)
equalbtn.bind('<Button-1>', click_btn_function)
Dotbtn.bind('<Button-1>', click_btn_function)
Zerobtn.bind('<Button-1>', click_btn_function)
#running the application
window.mainloop()
Note: We have also added and styled a Scientific Calculator Button. But it is not functional yet. We will cover that in a separate article.
Thank you so much for reading this article! I hope you found this GUI Calculator-making project using Python useful. Share this article with someone who needs help with such projects. Leave a comment to share your feedback or if you have any doubt.
It is one of the projects that we have on this site. Make sure to check out the other Projects and Useful articles here:


0 Comments