Our Objective: To create a Login Form and style it using Bulma CSS, which is a CSS Framework.

CSS stands for Cascading Style Sheet. Using CSS, one can style any HTML page and make it look presentable to the audience. But the only pain you have to face while writing CSS code is that it is a never-ending process. Writing CSS is quite complicated and requires a lot of time and effort for styling even a basic section of your page. So to solve this problem, Frameworks come into play. Frameworks provide a set of pre-written code that you just have to copy and paste wherever required. The pre-written code is in the form of classes and id’s that you have to add to your code. One major advantage of using frameworks is:
- saving a lot of time and efforts
- you can always customize the code
Table of Contents
What is Bulma CSS?
Bulma is a modern Cascading Style Sheet framework. It was developed by Jeremy Thomas, who is a well-known CSS Guru. This framework is built on CSS flexbox property and is based on Sass. It involves little or even no JavaScript, which is a USP as it helps in getting the work done easily. It also claims that no previous knowledge of CSS is required to use this framework, which is fairly true. But in order to use Bulma to its maximum potential, a little familiarity with CSS is good to have.
Just like the Bootstrap framework, it also provides CSS classes to help you in styling your HTML code. It provides ready-to-use frontend components that you can easily use to build responsive web applications.
What makes Bulma Unique?
Bulma is surely more modern and powerful in execution than Bootstrap. I have used both Bootstrap and Bulma, and I am in favor of Bulma because of its super easy-to-follow approach and high customizability. In Bulma, one can change anything since it is built on SASS. That’s quite a complex task to achieve and involves a lot of deep-diving into the code. But it offers that feature which is a great one in my opinion. So in totality following are the unique features that make Bulma stand out in the crowd:
- 100% Responsive
- It is designed based on a “mobile first” approach
- Modern
- It is purely built with Flexbox model
- Free
- It is a open-source framework
- Modular
- You don’t have to import everything, just import what you need
- No JS involved
- It is a pure CSS based framework and thus can be integrated in any JS environment
Integrating with BulmaJS
Surely only CSS integration makes Bulma a lot more easy to understand and use, even for the backend developers or someone new to the field. But if you want to use JS too, there’s one more library specially built for Bulma CSS. BulmaJS is also an open-source, pluggable Javascript library for Bulma.
Working Structure
Make a folder in your system with the project name of your choice. I have named the folder “Bulma CSS Login Form“. Now open the folder in your code editor. I have used VS Code for opening my project.
- Create an index.html file in that folder.
- Also create a style.css file.
Note: You will only need style.css in case you wish to import Bulma using CDN.
Once you have this working structure ready in your system, move ahead and follow the rest of the article:
How To Install Bulma CSS?
To use any framework, we have to import the framework in our working project or we can just download the whole of the framework and then use it. The latter method is not very advisable, if you share your project with someone and that person doesn’t have the framework downloaded in his/her local system, then the project won’t work the same for him. It will lack every component that you might have added to your project from that framework. Because his system couldn’t detect the components reference.
Installing Bulma CSS is a fairly easy process and can be performed using 2 different approaches. Either you can use the pre-compiled version of Bulma, which is a .css file. Or you can install the .sass file, in case you want to write and customize the Bulma classes according to your need.
Installing via .css file
- In the head section of your html file, paste the following code.
<link rel="stylesheet" href="https://cdn.jsdelivr.net/npm/bulma@0.9.3/css/bulma.min.css">- If you wish to use a separate .css file, then copy and paste this code in the top of your css file. And make sure to connect it to your .html file via link relation.
@import "https://cdn.jsdelivr.net/npm/bulma@0.9.3/css/bulma.min.css";Installing via Sass Library
Only install the collection of .sass files when you wish to write a completely new version of Bulma for your project. To install sass files via npm, use the following code:
npm install bulmaIt can also be installed via yarn.
yarn add bulmaIf you want to get Bulma by cloning its GitHub repository, then you can use:
gh repo clone jgthms/bulmaGetting Started with Bulma
Firstly, we have to make our webpage responsive in order to use Bulma correctly. For that, follow the below-mentioned procedure:
- Use the HTML5 doctype
<!DOCTYPE html>
- Now add the responsive viewport meta tag
<meta name="viewport" content="width=device-width, initial-scale=1">
Using Bulma To Create Our Login Form
For the purpose of creating a login form, I have installed Bulma with the HTML link in my .html file. I have also used Font Awesome CDN to use their icons.
I have used HTML5 to write the markup, which automatically comes with form validations. This login form right here is completely responsive in nature.
Complete Code To Create Our Login Form
<!DOCTYPE html>
<html>

<head>
    <meta charset="utf-8">
    <meta name="viewport" content="width=device-width, initial-scale=1">
    <title>Login Form Using Bulma CSS</title>
    <link rel="stylesheet" href="https://cdn.jsdelivr.net/npm/bulma@0.9.3/css/bulma.min.css">
    <link href="https://cdnjs.cloudflare.com/ajax/libs/font-awesome/5.13.0/css/all.min.css" rel="stylesheet">

</head>

<body>
    <section class="hero is-link is-fullheight">
        <div class="hero-body">
            <div class="container">
                <div class="columns is-centered">
                    <div class="column is-5-tablet is-4-desktop is-3-widescreen">
                        <form action="" class="box">
                            <div class="field">
                                <label for="" class="label">Email</label>
                                <div class="control has-icons-left">
                                    <input type="email" placeholder="e.g. shawnmendes@gmail.com" class="input" required>
                                    <span class="icon is-small is-left">
                                        <i class="fa fa-envelope"></i>
                                    </span>
                                </div>
                            </div>
                            <div class="field">
                                <label for="" class="label">Password</label>
                                <div class="control has-icons-left">
                                    <input type="password" placeholder="********" class="input" required>
                                    <span class="icon is-small is-left">
                                        <i class="fa fa-lock"></i>
                                    </span>
                                </div>
                            </div>
                            <div class="field">
                                <label for="" class="checkbox">
                                    <input type="checkbox">
                                    Remember me
                                </label>
                            </div>
                            <div class="field is-grouped is-grouped-centered">
                                <button class="button is-danger">
                                    Login
                                </button>
                            </div>
                        </form>
                    </div>
                </div>
            </div>
        </div>
    </section>
</body>

</html>
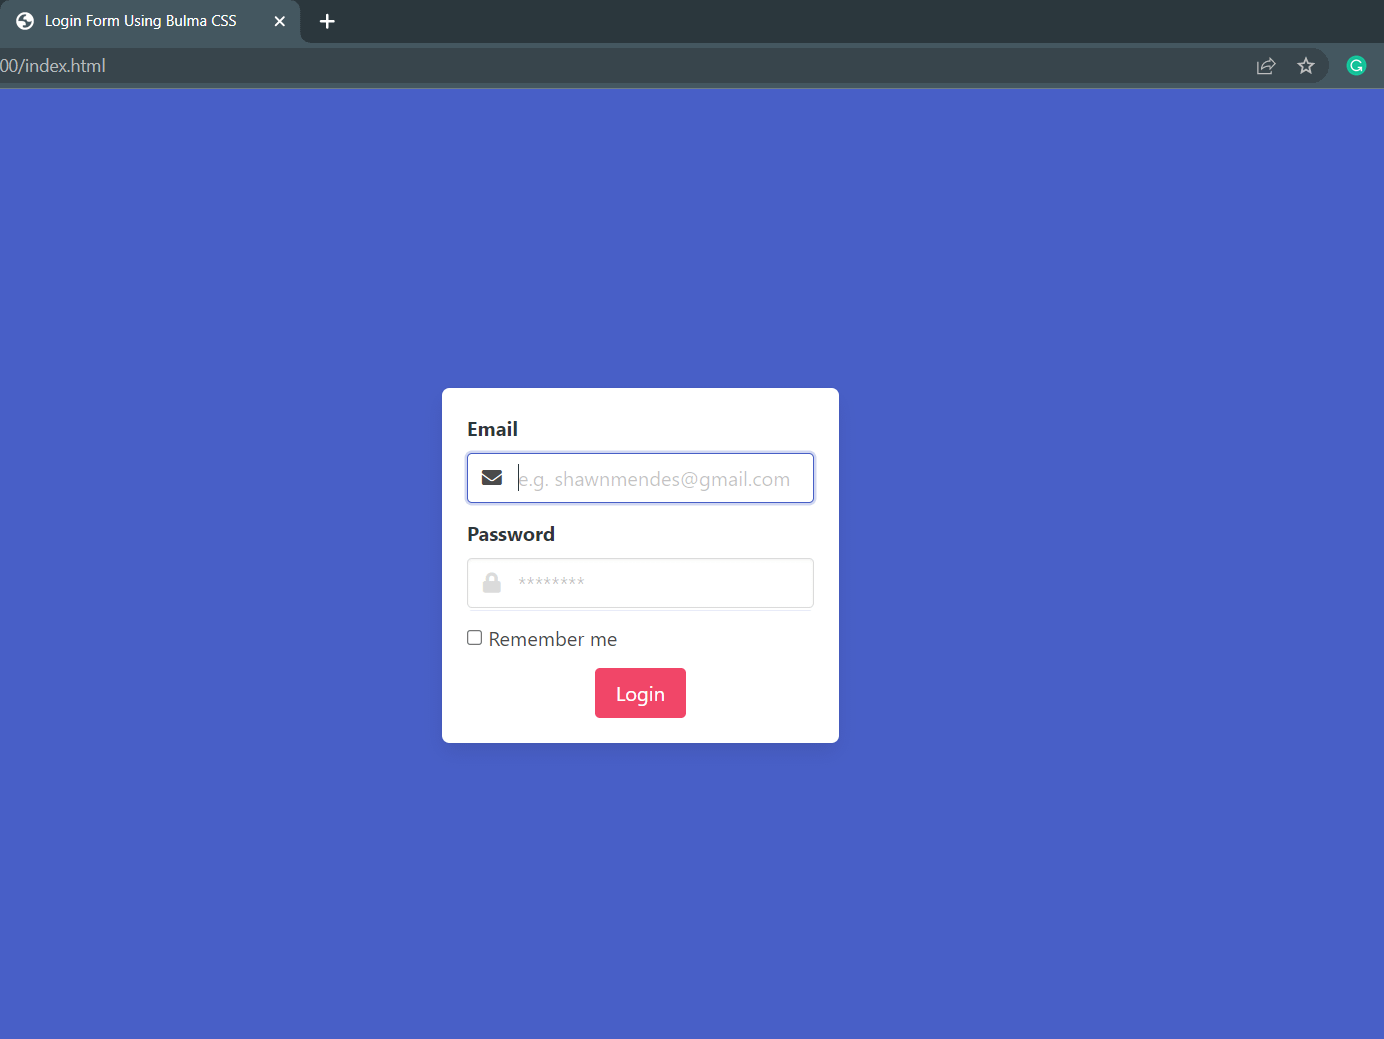
Output
So here’s the output of the above-written code. You can always play around with the colors and the design of your form, but make sure to get started. Bulma is so easy and enjoyable that it won’t feel like a task to apply CSS to your markup.

So that’s it for this starter guide sort-of-a tutorial for Bulma. That’s just a small representation of how Bulma can be your next companion to avoid writing CSS. Once you start using this framework, you will be able to complete the tasks in literally half time. That would be beneficial for your professional as well as your personal growth. Make sure to try this framework out and ask your doubts, if any.
Share the article and don’t forget to write your suggestions/ feedback in the comments section down below.
Connect with us on our Social Media Handles:
Have a look at our popular posts:
- How To Easily Find Image Size Using Python? (3 Methods)
- This is the Ultimate Python Code to Turn Any Image To ASCII Art
- Easily Code A Weather App In Python Using Tkinter
- 8 Best Python Books for Beginners and Advanced Programmers
- How to Code a Simple GUI Calculator in Python using Tkinter
- Easy Script to Make Your Own Youtube Video Downloader with Python


0 Comments